Sunday, November 13, 2011

Floral Course Work Cont.

Here are the arrangements from the second half of my floral course:

A bouquet made with a floral foam bouquet holder, carnations and various flowers.


A bouquet using a floral foam bouquet holder with various mums and gerbera daisies.

A pomander ball with yellow mums and craspedia.

Iris and bittersweet.

Wired greens.

Halloween arrangement with mums and Asian lillies.

A birch basket with various mums, wheat, hypericum berries and leaves.


Sunday, October 23, 2011

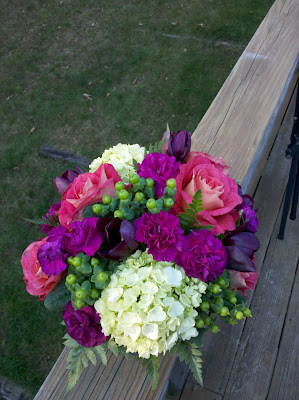
Mixed Flower Centerpiece

This arrangement was made for my parents' 29th wedding anniversary. I love the colors, and it lasted for a long time.

What you will need: salmon colored roses (these were called big fun) (if you can get short stem or spray roses buy those), purple carnations, 2 small green hydrangea, green hypericum berries, dark purple tulips, leatherleaf, 2 tropical leaves, round vase, wet floral foam, and clippers.


1. While you soak your floral foam in water take the 2 tropical leaves and cut off the stems. Take a floral knife and remove the spine of the leaf so the leaf will bend easily around the vase.

2. Wrap the 2 leaves around the inside of the vase so the floral foam will be covered.


3. Insert the floral foam and add water to the vase. If you want the flowers to angle down more on the sides make sure the floral foam is a bit taller than the vase.

4. I decided to have the hypericum berries as the center of the arrangement. Make sure this is your highest point. Because the hydrangeas are small I angled them to either side of the vase. If you don't like the look of the large area of hydrangea you can break it up by adding flowers in between the hydrangea stems.

5. Add the tulips in next as they are very fragile. Make sure to put each at a different height and angle around the vase.

6. Add a few roses around the vase. Make sure to have different heights to make the rounded look. 

7. Start to add the carnations to fill in gaps between flowers.

8. Add some leatherleaf to the arrangement to add more texture. Make sure to break the leaf up into smaller pieces.

9. Make sure the arrangement looks rounded and the flowers cover the rim of the vase.


Enjoy!

Saturday, October 15, 2011

Floral Course Work

I've been taking a professional floral course at Cass School of Floral Design and I absolutely love it. I thought I'd post some of the work I've done so far!

  Here is a round arrangement using floral foam:

A large arrangement using leaves as the holding device:

An L-shaped arrangement:

Using the principles of Shin Soe Tai:

A cascade (in this case a casket cover):

An oval shaped arrangement:

Wiring flowers:

A spray arrangement:

A boutonniere:

A boutonniere:

A wrist corsage using glue:

A double-ended wrist corsage:
 

A head wreath:

A pin corsage:


Sunday, October 2, 2011

Easy & Beautiful Autumn Wreath


For this arrangement, I decided to use fake flowers so it would last for the entire season. I love the warm colors and different textures that make up the wreath. See below on a step-by-step on how to make this arrangement:

1. For this design you will need the following: floral tape, floral wire, wire cutters, scissors, glue gun, grapevine wreath, berries, dried wheat, red, yellow, orange, and purple flowers, green/yellow leaves and red/orange leaves. I happened to get all of these materials at A.C. Moore.

When deciding on what size to buy the grapevine wreath, measure the width of your door and subtract 6 inches.

2.  Gather the wheat and bunch together by putting half of the wheat facing up and the other half facing down. Wrap the center with floral tape to hold together. Wrap floral wire around the tape and angle the bunch in the lower left corner of the wreath. Make sure to leave enough wire at ends to wrap around the wreath. To position securely, wrap the wire tightly around the grape vine in a way that hides the wire. 

3.  Pick two large leaves to glue together at an angle and glue to the center of the wheat bunch. Cut one flower from the bunch (I used purple) and remove half of the plastic surrounding the wire. Stick into the grapevine and securely glue the flower on the leaves.

4. Glue in a bunch of berries to place in front of the leaves and in back of the flower.

5. I started by grouping three different colored leaves together and gluing them together in a fan shape. Once the leaves have been glued together, start gluing the leaves to the lower right corner of the wreath. Make sure to use them to cover the inner and outer parts of the wreath. To start the flowers I decided to bunch three of the smaller flowers together, followed by one large. Make sure to cut the flowers close to the base but be sure to leave enough wire at the end so the flower doesn't fall apart. Cover the entire bottom with glue for a strong hold.

6. Start to fill in spaces between the flowers with various colored berries. Be sure to glue these in place.

7. Continue to glue the leaves and flowers on the wreath, be sure to change the position on the various colors so they are both in the inner and outer areas of the wreath. I used four small flowers in the middle of the design so it wasn't all the same. After the next large flower follow by three small.
8. be sure to fill in spaces with the various berries and end the design in the middle of the wreath so it aligns with the lower half.

I had a lot of flowers left over so I made an arrangement for the living room and dining room. The large arrangement on the kitchen table is too large if you have four people sitting at a table, but it's just me so I kept it large to fill up some space.

Be sure to make your arrangements for the kitchen table smaller than 14 inches so you can see everyone easily.

Saturday, September 17, 2011

Unexpected Orchid Display

For this arrangement, I was inspired by the book Fresh Flower Arranging by Mark Welford and Stephen Wicks. I had some orchids that were a bit past their prime so I decided to try out this modern orchid display. This was very easy to accomplish and requires only a small amount of orchids. See below for a step-by-step on how to make this arrangement:


1.  For this design you will need the following materials: a thin, clear column glass vase or fishbowl, 2 green orchid stems, flower food, green floral wire, a wire cutter, and a floral pruner.


2.  Fill the vase with a few inches of water and add the floral food. Cut the orchid flowers off the main stem so a short stalk remains at the base at each flower. Cut about 8 inches of the green wire and make a small hook at one end and place the hook on the side of the flower stalk. Wind the wire around the stalk two or three times. Be very gentle while wrapping the wire so you don't damage the stalk. Spiral the rest of the wire around your fingers and pull them out slightly for a loose spiral. 


3.  When you have wired all the orchids, cut several more lengths of wire and make loose spirals. These spirals will prevent the orchids from falling to the bottom of the vase. Place a few of the spirals at the bottom of the vase.


4.  Now add some orchids on top of the wire frame: make sure to have the orchids facing outwards. Place the orchids at different angles to give it a bit more interest. If you use a taller vase place the orchids at various heights so they look as if they are climbing up the vase. If you use pink orchids make sure to purchase pink floral wire. Once all the orchids are positioned, fill the vase to the top with water. You may need to reposition any orchids that move. Be careful not to bruise the flower. Finish by adding some of the remaining wire to any blank areas.


Enjoy!!

Saturday, September 10, 2011

Splendid Beginnings

While I finish setting up my blog I thought it would be fun to show some of the floral arrangements I've made this summer:


Fluffy peonies in a vase of vibrant limes:

Various purple carnations with green mums and swirled beach grass:

A mixture of hydrangeas, canterbury bells, and spray roses in pots wrapped with twine:

Dahlias, eryngium, hydrangeas, trachelium, and orchids:

Spray roses, carnations, daisies, and various greens: